How to Install Closure Wig without Glue
Outline:
- Introduction
- Understanding Closure Wigs
- Benefits of Closure Wigs
- Preparing for Installation
- Installing a Closure Wig without Glue
- Styling and Maintaining Your Closure Wig
- Conclusion
- FAQs
Introduction
Closure wigs are a popular choice among those seeking versatile and natural-looking hairstyles. They provide a realistic hairline and allow for various styling options. While many closure wigs are installed using glue, there is an alternative method that avoids the use of adhesive. In this article, we will explore how to install a closure wig without glue, providing step-by-step instructions and essential tips for achieving a seamless and comfortable fit.
Understanding Closure Wigs
Before diving into the installation process, it's essential to understand what closure wigs are. Closure wigs are hairpieces that consist of a lace closure or silk base, which mimics the appearance of a natural scalp. These wigs offer a more realistic look by providing a natural hairline and the illusion of hair growing directly from the scalp. Closure wigs come in various lengths, styles, and textures, making them suitable for different preferences and occasions.
Benefits of Closure Wigs
Closure wigs offer several advantages that make them a popular choice among wig wearers:
- Versatility: Closure wigs allow for versatile styling options, including parting the hair in different directions or pulling it up into various updos.
- Natural Appearance: The closure mimics the appearance of a natural scalp, providing a realistic hairline and natural-looking hair.
- Protective Style: Closure wigs can serve as a protective style, allowing your natural hair to rest and grow while still maintaining a fashionable and appealing look.
- Easy Maintenance: Closure wigs are relatively easy to maintain and require minimal styling compared to traditional sew-in weaves.
Preparing for Installation

Before installing a closure wig without glue, there are a few steps you should follow to ensure a successful and long-lasting result.
1. Choosing the Right Closure Wig
Selecting the right closure wig is crucial for a comfortable and natural-looking installation. Consider the following factors:
- Type of Closure: Choose between lace closures or silk base closures, depending on your preference for a more natural or durable look.
- Hair Texture: Select a closure wig that matches your natural hair texture to ensure a seamless blend between your natural hair and the wig.
- Hair Length and Color: Choose a closure wig that matches the length and color of your natural hair for a cohesive and realistic appearance.
2. Preparing Your Natural Hair
Properly preparing your natural hair is essential to ensure a secure and comfortable fit for your closure wig.
- Cleanse and Condition: Start by washing and conditioning your hair to ensure it's clean and moisturized before installation.
- Cornrow Your Hair: Create small, neat cornrows on your natural hair. This provides a flat base for the closure wig and helps to distribute the weight evenly.
Installing a Closure Wig without Glue
Now let's explore three different methods for installing a closure wig without using glue.
Method 1: Sew-In Method
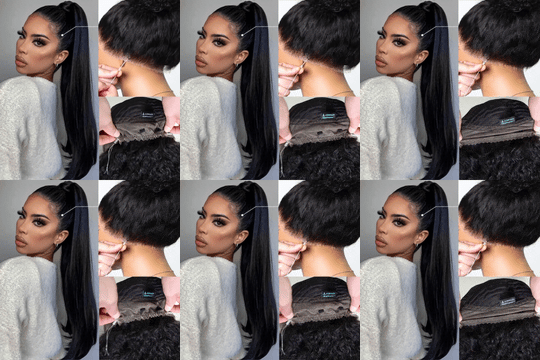
The sew-in method involves attaching the closure wig to your natural hair using needle and thread.
Step 1: Cornrow Your Hair
Start by sectioning your natural hair into neat cornrows. Ensure the cornrows are close together and flat against your scalp.
Step 2: Prepare the Closure Wig
Position the closure wig on your head, ensuring it aligns with your natural hairline. Adjust the wig to achieve the desired style and fit.
Step 3: Sew the Wig onto the Cornrows
Using a needle and thread that matches your hair color, sew through the wig's wefts and into the cornrows. Secure the wig by stitching along the perimeter of the closure and through the cornrows. Be careful to maintain a natural-looking hairline as you sew.
Method 2: Wig Clips or Combs
This method involves attaching wig clips or combs to your natural hair to secure the closure wig in place.
Step 1: Section Your Hair
Create sections in your natural hair where you intend to attach the wig clips or combs. These sections should align with the wig's attachment points.
Step 2: Attach the Wig Clips or Combs
Sew the wig clips or combs onto the sections of your natural hair. Ensure they are securely attached and can hold the weight of the closure wig. Once attached, position the closure wig on your head and secure it by snapping the clips or comb teeth into the wig cap.
Method 3: Adjustable Straps
This method involves using adjustable straps to secure the closure wig without the need for glue or clips.
Step 1: Prepare Your Natural Hair
Similar to the previous methods, start by sectioning and cornrowing your natural hair to create a flat base.
Step 2: Adjust the Straps of the Closure Wig
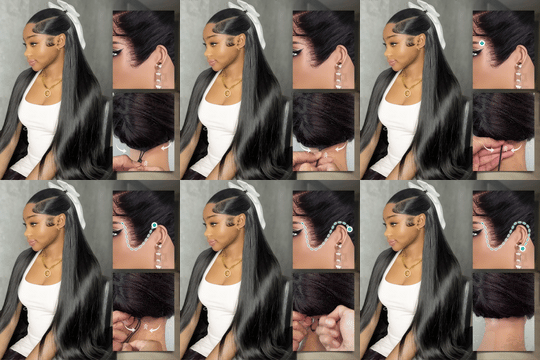
Position the closure wig on your head and adjust the straps to achieve a snug fit. Ensure the wig aligns with your natural hairline and feels secure.
Styling and Maintaining Your Closure Wig
Once your closure wig is installed, there are essential tips to keep in mind for styling and maintenance.
1. Styling Options
Closure wigs offer various styling options, including straightening, curling, or even creating updos. However, be cautious when applying heat to synthetic wigs, as they may not withstand high temperatures.
2. Daily Maintenance
- Gently brush or comb your closure wig to prevent tangling and maintain a neat appearance.
- Use a wig-friendly detangling spray to ease the process of removing any knots or tangles.
- Protect your closure wig by wearing a satin or silk bonnet or using a satin pillowcase when sleeping.
3. Washing and Conditioning
- Follow the manufacturer's instructions for washing and conditioning your closure wig.
- Use mild shampoos and conditioners specifically formulated for wigs.
- Gently wash your closure wig, focusing on the hair strands and avoiding excessive rubbing or tangling.
- After washing, apply a lightweight conditioner and leave it on for a few minutes before rinsing thoroughly.
- Allow the closure wig to air dry or use a wig stand to maintain its shape while drying.
4. Avoiding Tension and Heat Damage
- Be mindful of the tension applied to your closure wig. Avoid tight hairstyles or excessive pulling, as this can strain your natural hair and the wig attachment.
- Minimize the use of heat styling tools, as excessive heat can damage the wig fibers. If you do use heat, use a heat protectant spray and low to medium heat settings.
Conclusion
Installing a closure wig without glue provides a practical and versatile alternative for those who prefer not to use adhesives. By following the step-by-step methods outlined in this article, you can achieve a secure and natural-looking installation. Remember to choose the right closure wig, prepare your natural hair, and follow proper maintenance practices for long-lasting results. Embrace the beauty and convenience of closure wigs without the need for glue.
FAQs
1. Can I swim or shower with a closure wig installed without glue?
Yes, you can swim or shower with a closure wig installed without glue. However, it's essential to protect the wig by wearing a swim cap or using a waterproof wig adhesive tape to ensure it stays securely in place.
2. How long can I wear a closure wig without glue?
With proper installation and maintenance, you can wear a closure wig without glue for several weeks. However, it's recommended to remove and re-install the wig periodically to clean your natural hair and scalp.
3. Can I remove the closure wig easily without damaging my natural hair?
Yes, closure wigs installed without glue can be easily removed without causing damage to your natural hair. Simply follow the reverse steps of the installation process, gently detangling the wig from your hair and carefully taking it off.
4. Are closure wigs without glue suitable for people with sensitive skin?
Closure wigs without glue can be a suitable option for people with sensitive skin. However, it's important to choose wig materials that are hypoallergenic and avoid any adhesive or attachment methods that may cause irritation.
5. Can I dye or bleach a closure wig that is installed without glue?
Yes, you can dye or bleach a closure wig that is installed without glue. However, it's recommended to seek professional assistance to ensure proper color application and prevent damage to the wig fibers.


Leave a comment